Monday, December 21, 2009

Yummy Treat!


Are you filling your kitchen with yummy treats? Have you tried these easy pretzel turtles yet? They are my new favorite.

They really are the easiest ever. Try not to eat them all.

Do you have a Christmas treat you must have during the holidays?

Friday, December 4, 2009

Snowflake-ish

Remember the leftover pieces I had from the wreath? I glued 12 of them together and created these snowflake-ish things.

Similar to these ornaments, except that my leftover paper pieces were 1"x5", and I used 12 of them. I thought about hanging them but they stand well on their own so now they line our fireplace mantle.

With all my leftover pieces I had enough to make 7 of these. So for those who are interested in making the wreath you really only need 3 - 4 12"x12" pages.

Thursday, December 3, 2009

Paper Wreath


The holiday crafting has begun! I used this tutorial from Razzle Dazzle Crafting, and I think it turned out pretty well. At least now our front door looks a little more festive.

I cut 8 sheets of 12"x12" scrapbook paper from my stash, which created more than enough paper loops to go around the 14" wreath form that I used. In fact I'm using the leftovers for a different project...coming soon!

Tuesday, November 24, 2009

Daisy

I've been knitting again, and I love it!

The Itty-Bitty Hats patterns by Susan B. Anderson are simple and cute. I've had my eye on the upside-down daisy hat, and I finally got around to making it. I loved using the baby merino wool I brought back from New Zealand, and I'm wishing I had crammed more of it into my suitcase!

Monday, November 16, 2009

Crochet Flower Variation


This flower is similar to the Floppy Flower but it is smaller and holds it's shape a little better.

Materials
1 skein of non-divisible, fray resistant craft thread or crochet thread
Size 3/2.1 mm crochet hook
button or other embellishment

Instructions
Make ring: ch 2, sc 14 in 1st ch, join with slip stich to first sc.

Round 1: ch 6, sl st 5 down the chain, sl st in same as beginning of chain,
[sl st, sc, ch 6, sl st 5 down the chain, sl st in same as sc before chain] 6 times (7 petals total).

Round 2: sl st, [sc, sc, sc, hdc, hdc 3, hdc 2, hdc, sc, sc, sc, sk 1, sl st, sk 1] 6 times.
sc, sc, sc, hdc, hdc 3, hdc 2, hdc, sc, sc, sc, sk 1, sl st, fasten off.

Attach button to the center.

As you can see this is a fairly easy pattern to modify to your liking. Enjoy!

Tuesday, November 10, 2009

Pine cone Turkey

A quick fall craft using bits of nature! And great to use to decorate for Thanksgiving...

Supplies:
pine cone (the more round the better)
leaves of various color
googly eyes
yellow foam or paper for the beak
red felt for wattle
glue

We used the stem end of the pine cone as the head. Glue the leaves to the pine cone between the scales of the pine cone arranging them like feathers. Glue the eyes, beak, and wattle.

If you have brown pompoms available you might try using those as the head and glue the eyes, beak, and wattle to that.

I'm not sure how long the leaves will stay this vibrant, but you could use all sorts of things instead of leaves...paper, feathers, etc.

Saturday, October 31, 2009

A Halloween Treat!


Crocheted Floppy Flower

Materials
1 skein of non-divisible, fray resistant craft thread or crochet thread
Size 3/2.1 mm crochet hook
button or other embellishment

Instructions
Make ring: ch 2, sc 14 in 1st ch, join with slip stich to first sc.

Round 1: ch 6, sc 5 down the chain, sl st in same as beginning of chain,
[sl st, sc, ch 6, sc 5 down the chain, sl st in same as sc before chain] 6 times (7 petals total).

Round 2: sl st, [sc, sc, hdc, dc, dc 4, dc 3, dc, hdc, sc, sc, sk 1, sl st, sk 1] 6 times.
sc, sc, hdc, dc, dc 4, dc 3, dc, hdc, sc, sc, sk 1, sl st, fasten off.

Attach button in the center.

Friday, October 30, 2009

Wednesday, October 28, 2009

Tuesday, October 27, 2009

What to do?


I was trying to wait until after Halloween to try new pumpkin recipes but alas I was unable to contain myself from picking up a can of pumpkin puree from the grocery store. So now I've made pumpkin cookies and buttermilk pumpkin pancakes...but now what? I've got probably about a cup or so left...any suggestions?

Monday, October 26, 2009

Updated Pumpkin

Sticky back velcro dots stick much better to the pumpkin and foam. We made some more interchangeable parts too!

Sunday, October 11, 2009

Ms. Pumpkin Head


This week we went in search for a pumpkin patch so yours truly could select a pumpkin worthy of decorating. After watching "It's the Great Pumpkin, Charlie Brown" a few too many times, this one really believes that there is a Great Pumpkin and wants to be a ghost with lots of eyes for Halloween...wow media is oh so powerful.

Well, our search was a bit anticlimactic since we ended up scrounging around in the pumpkin bin at our closest Walmart, but we found a lovely pumpkin in the end.

Wanting to avoid the mess involved with carving and because we want to eat it later, we opted for a cleaner decorating option involving craft foam, scissors, markers, and adhesive. This turned out to be something a three year old could actually handle too! She picked the colored foam and drew the parts (including hair, ears, and arms), I cut them out and added adhesive and she placed them on the pumpkin. We have lots of foam so we can even make more parts to change things up similar to Mr. Potato Head, but Ms. H is convinced this is a "she" so we've resorted to calling her Ms. Pumpkin Head.

Note: double sided tape doesn't work very well with the foam. I'm going to try adhesive velcro when I remember to pick some up.

Monday, June 22, 2009

Easy Peasant Skirt

I had some extra fabric and came across this great peasant skirt tutorial. The fabric I used was stretchy but it worked okay. I would have loved to have serged the edges and sewn them overlapping on the right-side, but uhh no serger and no extra time. I did attempt a lettuce edge on the hem, which I've decided is definitely the easiest way to handle the hem with stretchy fabric. Hmmm, must find some fabric to whip one of these up for me!
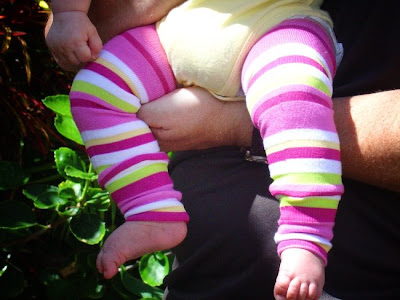
Baby Legs

I'm probably the last person to try this super easy tutorial to make baby legs. I've had multiple pairs of socks in my stash for a while, and I finally got around to making them. They were so easy (I think I finished 3 pairs in a half hour), and they are about 3 times cheaper than the $10/pair already made from the store. They also double as arm warmers for my super skinny 3 year old who wants to wear everything her baby sister is wearing. Good thing we're traveling in a cooler climate so I can put these to good use!

Friday, June 5, 2009

Applique some onesies


I love how easy it is to customize your own onesie (I love you Heat N' Bond). The idea for this one comes from Alissa (I love her super cute fabric choice), and you can get the free pattern for the kimono shoes from HomeSpun-Threads.

Check out these ideas and tutorials. Now, if only my fabric stash were more accessible!

SMS basic applique

Thursday, June 4, 2009

It's A Boy!

A dear friend is having a baby soon, so we celebrated yesterday with lots of ice cream and other yummy treats. I wanted to share the printables in case anyone else wanted to use them. I obviously went the simplistic route...go crazy and let me know if you use them!

Large version
(intended to make a garland type thing to decorate the room)
Tags (used on the favors and on gifts around the room)
Toppers (you could double side them on the toothpick and tie a ribbon under for a "super cute, I-have-too-much-time-on-my-hands" look)

Saturday, May 16, 2009

Toddler Pa'u Skirt


For Personal Use only. Feel free to link to it, but please do not distribute or make it for profit.

Materials

2 yards of 45" wide fabric
1 1/2 yards of 1/2" elastic
matching thread

Instructions

1. Calculate the height of the skirt. Measure your child from the waist
to mid-calf (or longer) and add 8 inches for the casing. In my case the
total height is 21 inches.

2. Cut the fabric using the measurement made in Step 1. You should
have a piece of fabric that measures 2 yards by your height
measurement. In my case, 2 yards by 21 inches. (Tip: use a cutting mat
and rotary cutter for a straighter cut)


3. Sew the short ends together (5/8" seam). Press the seam open.


4. Fold the cut edge toward the selvage edge (wrong sides together) to form an 8 inch casing. Pin and iron the fabric.


5. Sew the ruffle row 3/4" from the folded edge.

6. Sew 3 casing rows each 3/4" wide leaving a space in each row to slide in the elastic.

7. Measure your child around the waist and cut 3 equal pieces of elastic.

8. Work the elastic into the 3 casing rows starting with the row
closest to the ruffle row. Join elastic ends (make sure you don't twist
the elastic) and sew the row closed. Use the same process for the other
two rows.

If you would like to hem the edges of your skirt, add an extra 1" to
your height measurement and make a 1/4" turn hem on each edge before
Step 4.

Note: To make an adult pa'u skirt use 4 to 5 yards of fabric and the full 45" width. Just fold over the excess to make the casing.

Tuesday, May 12, 2009

Paper Baby Shoes

baby shower party favors

I made these over a year ago for a friend's baby shower, and I've finally made a downloadable pattern for it! Download it here and test it out.

Remember that this is for personal use only. Please, please, please link back to this page if you post it online.